
Spatial Transformer Networks
Convolutional Neural Networks (CNN) possess the inbuilt property of translation invariance. This enables them to correctly classify an image at test time, even when its constituent components are located at positions not seen during training. However, CNNs lack the inbuilt property of scale and rotation invariance: two of the most frequently encountered transformations in natural images. Since this property is not built in, it has to be learnt in a laborious way: during training, all relevant objects must be presented at different scales and rotations. This way the network learns a redundant set of features for each scale and each orientation, thus achieving the desired invariances. As a consequence, CNNs are usually very deep and require a lot of training data to gain high accuracies.
Spatial Transformer modules , introduced by Max Jaderberg et al., are a popular way to increase spatial invariance of a model against spatial transformations such as translation, scaling, rotation, cropping, as well as non-rigid deformations. They can be inserted into existing convolutional architectures: either immediately following the input or in deeper layers. They achieve spatial invariance by adaptively transforming their input to a canonical, expected pose, thus leading to a better classification performance. The word adaptive indicates, that for each sample an appropriate transformation is produced, conditional on the input itself. Spatial transformers networks can be trained end-to-end using standard backpropagation.
1. Forward
1.1. Separation of Responsibilities
In order to understand the motivation behind some of the building blocks of the spatial transformer module, we have to quickly repeat the principles of reverse mapping introduced in the last section.

In reverse mapping we go through the output image, one pixel at a time, and for each position we perform two operations:
- Use the inverse transformation 𝑇-1{…} to calculate the corresponding position in the input image
- Sample the pixel value using bilinear interpolation
The reason we are performing both operations directly one after the other in the animation above is mainly to illustrate the concept of reverse mapping. When implementing reverse mapping, however, it is beneficial to first calculate the corresponding positions for all output pixels (and maybe store them), and only then apply bilinear interpolation. It should be obvious, that this has no effect on the final outcome.
The main benefit of this approach is that we now get two components with separate responsibilities: grid generator and sampler . The grid generator has the exclusive task of performing the inverse transformation and the sampler has the exclusive task of performing bilinear interpolation. Furthermore, as we will see in the next post, the separation strongly facilitates backpropagation.
1.2. Grid Generator
The grid generator iterates over the regular grid of the output/target image and uses the inverse transformation $𝑇^{-1}{…}$ to calculate the corresponding (usually non-integer) sample positions in the input/source image:

The superscripts 𝑡 and 𝑠 are taken from the original paper and denote “target image” and “source image”. The row and column indexes of the sampling grid are denoted as 𝑖 and 𝑗, respectively. Please also note, that in the original paper the inverse transformation $𝑇^{-1}{…}$ over the regular output grid is denoted as 𝒯𝜃(𝐺).
Whereas in the above illustration the coordinates are calculated in a sequential manner for the sake of clarity, real world implementations of the grid generator will try to transform as many points as possible in parallel for reasons of computational efficiency.
The output of the grid generator is the so called sampling grid, which is a set of points where the input map will be sampled to produce the spatially transformed output:

where

Please note, that the size of the sampling grid, determines the size of the target image.

One last important thing to mention about the sampling grid is, that its height and width do not necessarily need to be the same as the height and width of the input image.
1.3. Sampler
The sampler iterates over the entries of the sampling grid and extracts the corresponding pixel values from the input map using bilinear interpolation:

The extraction of a pixel value consists of three operations:
- Find the four neighboring points (upper left, upper right, lower left and lower right)
- For each neighboring point calculate its corresponding weight
- Take the weighted average to produce the output
All operations are summarized in the following equation:

Remember 𝑑𝑥 denotes the horizontal distance from the sample point to the right cell border and 𝑑𝑦 the vertical distance to the top cell border.
As in the grid generator the calculation of each output pixel is totally independent of any other output pixel. Hence again, real world implementations of the sampler will speed up the process, by extracting in parallel as many points as possible.
1.4. Localisation Net
The task of the localisation network is to find parameters 𝜃 of the inverse transformation $𝑇^{-1}{…}$, which puts the input feature map to a canonical pose, thus simplify recognition in the following layers. The localisation network can take any form, such as a fully-connected network or a convolutional network, but should include a final regression layer to produce the transformation parameters 𝜃:

The size of 𝜃 can vary depending on the transformation that is parameterized, e.g. for an affine transformation 𝜃 is 6-dimensional:

The affine transform is quite powerful and contains translation, scaling, rotation and shearing as special cases. For many tasks however a simpler transformation may be sufficient, e.g. a pure translation is implemented using only 2 parameters:

Both the grid generator and the sampler are parameter less operations, i.e. they don’t have any trainable parameters. In this regard they are comparable to a max-pooling layer. The brainpower of a spatial transformer module hence comes from the localisation net, which must learn to detect the pose of the input feature map (such as its orientation, scale etc.) in order to produce an appropriate transformation.
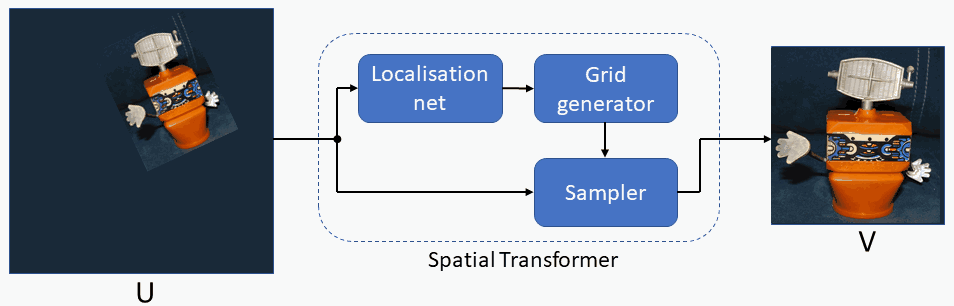
1.5. Complete Module
Finally, let us take a look at how the single building blocks of the spatial transformer module interact with each other. The input feature map 𝑈 is first passed to the localisation network, which regresses the appropriate transformation parameters 𝜃. The grid generator then uses the transformation parameters 𝜃 to produce the sampling grid, which is a set of points where the input feature map shall be sampled. Finally, the sampler takes both the input feature map and the sampling grid and using e.g. bilinear interpolation outputs the transformed feature map.

At this point we would like to call again attention to the fact, that the localisation net predicts the transformation parameters individually for each input. In this manner, the spatial transformer module becomes an adaptive component, whose behavior is conditional on the input.
1.6. Multiple Channels
So far, we have demonstrated the principles of the spatial transformer module on inputs with a single channel 𝐶 = 1, as encountered in e.g. grayscale images. However, oftentimes spatial transformer modules are used in deeper layers and operate on feature maps, which usually have more than one channel 𝐶 > 1. Even when used immediately following the input, spatial transformer modules may face inputs with more than one channel, such as RGB images which have 3 channels.
The extension is simple: for multi-channel inputs, the mapping is done identically for each channel of the input, so every channel is transformed in an identical way. This way we preserve spatial consistency between channels. Note, that spatial transformer modules do not change the number of channels 𝐶, which remains the same in input and output feature maps.
2. Backpropagation
2.1. Gradient Flow
Before we start deriving formulas, let us quickly take a look at how the gradient is flowing back through a spatial transformer module:

The animation above clearly illustrates why spatial transformers networks can be trained end-to-end using standard backpropagation. We start with the gradient at the output of the module, which already has been computed in a higher layer. The first thing we have to do, is to derive explicit formulas to propagate (or flow) this gradient back through the sampler to both the input feature map and the sampling grid. Than we will have to derive the formulas governing the backpropagation through the grid generator. Remember that sampler and grid generator are both parameter less operations, i.e. don’t have any trainable parameters. Lastly, we have to backpropagate the gradient through the localisation network, which is a standard neural network, hence no new formulas have to be derived here. It is the localisation network where a parameter update is taking place.
2.2. Gradient w.r.t sampling grid coordinates
As in all previous posts we will assume the sampler is using bilinear interpolation to transform the input feature map. Let us quickly recall the corresponding formula. For each entry of the sampling grid:

the sampler first finds the four neighboring values by taking the floor and ceil operations:

We dropped the superscript “𝑠“ for the sake of clarity. Next, the sampler calculates the horizontal distance from the sample point to its right cell border and the vertical distance to the top cell border:

Finally, it takes a weighted average to produce the output:

To get an intuition for the wanted derivatives, let us wiggle a single (!) entry of the sampling grid:

We see, that the wiggling affects only a single pixel in the output feature map. This is to be expected, since the sampler operates independently on each entry of the sampling grid (the reason why the sampler lends itself perfectly to parallelization). To backpropagate the loss error from the output feature map to the sampling grid, all we have to do is to apply the chain rule:

where 𝓛 is the loss function. Next, we must take the derivative of 𝑉 w.r.t to 𝑥:

which requires us to take the derivative of the horizontal distance:

To proceed further we have to take a look at the derivative of the ceiling operation:

As we can see, the ceiling operation is piecewise constant and the derivative of a constant is zero. The ceiling operation is discontinuous at integer values of 𝑥 and is non-differentiable there.
Technically speaking we cannot apply gradient descent on a non-differentiable function. Our remedy is the so-called sub-derivative, which is an extension of the derivative, see references. Practically it boils down to setting the derivative to zero at integer values of 𝑥:

and analogously:

Formally, we are now calculating the sub-gradients instead of gradients. Our final formula is:

and after rearranging:

For the 𝑦 component we get accordingly:

2.3. Gradient w.r.t input feature map
Before we dive into mathematical formulas, let us again first develop an intuition. This time we must wiggle the value of a pixel in the input feature map, say at coordinates (2, 1):

We see, that wiggling a single pixel in the input feature map, causes several pixels in the output feature map to change. To understand the reason, let us take a closer look at the sample points of the affected output pixels:

We notice that all mentioned sample points have something in common: the input pixel at coordinates (2, 1) always belongs to one of their four neighboring points used in bilinear interpolation. Please also notice how input pixel (2, 1) is sometimes the upper right neighbor, sometimes lower left neighbor and so on.
The chain rule used to backpropagate the error now becomes:

where the two sums consider the fact, that each pixel in the input feature map might (potentially) affect multiple pixels in the output feature map. In the next step, we must evaluate the expression ∂𝑉/ ∂𝑈, which strongly depends on the relative position of 𝑈 with respect to 𝑉‘s sample point (upper left neighbor, upper right neighbor etc.). To this end we rewrite the bilinear interpolation formula in the following way:

The corresponding derivatives are:

We now have all the necessary formulas to compute the gradient. To get a better intuition for the whole procedure, let us apply it to the example in the animation above. Here, input pixel (2, 1) affects the following five output pixels (0, 0), (0, 1), (1, 0), (1, 1) and (2, 1):

The main challenge of the procedure seems to lie in finding all the affected output pixels. Luckily, in the actual implementation we can omit the explicit search altogether by exploiting linearity:

To this end we first initialize an empty array for the gradient ∂𝓛 / ∂𝑈 and then iterate over the entries of the sampling grid. For each entry we use the second last formula to compute all four derivatives ∂𝑉/ ∂𝑈, which we subsequently multiply by the corresponding entry of the gradient ∂𝓛 / ∂𝑉. The last remaining step, is to add the four computed values to the gradient array. Please note, that each value is added at a different position, defined by the positions of the four neighboring points. At the end of the whole procedure, each entry of the gradient array will contain a complete sum of all affected output pixels.
2.4. Backpropagating through the grid generator
We have seen how the loss function depends on all the coordinates of the sampling grid:

Furthermore, each sample coordinate is a function of the parameters provided by the localisation network:

Applying the chain rule for multivariate functions hence gives us:

In the following, we will assume the grid generator is using an affine transformation:

Since the target coordinates lie on a regular sampling grid, we have:

such that the above equation reduces to:

The corresponding derivatives are:

and zero for the remaining cases. To obtain the final formulas, we have plug those derivatives back into the chain rule above:

and analogously:

As mentioned in the first section, the grid generator is usually implemented as a standard neural network, such as a fully connected network or a convolutional network. For this reason, we don’t need to derive any new backpropagation formulas.